


Table of Contents
Introduction
Daily digests are an awesome way to stay on top of what is happening, without having to subscribe to multiple sources of news or remember to check a number of platforms or channels.
What’s awesome about them as well? They’re pretty easy to build.
I built The Tech Rooport over a few days and most of that time was really spent tweaking, monitoring, and waiting for the email to send, as I configured it to run daily and to only populate new articles.
The below breakdown of how to build one is based on my (limited!) knowledge of building The Tech Rooport, which is a daily digest of the best Aussie, New Zealand and Global tech and startup news.
Before we jump into the deep end, it’s worth checking it out so you know what we’re building:
If you think it’ll add value to you, definitely subscribe! I’ve had great feedback and gained 150+ subscribers in less than a week.
Here’s what you’ll learn in this break down:
- Why build an automated daily digest?
- How much does it cost to build and maintain?
- What tools can you use to build a daily digest email?
- How do you test and maintain it?
- How do you knock up a really quick, and awesome brand and sign up page to promote it?
Why build an automated daily digest?
Daily digest emails are a great way to get a summary of what is happening across a variety of media sources, from news to industry bodies.
They save time because you don’t have to:
- Subscribe to a number of media newsletters
- Visit a number of sites and platforms
- Read whole articles – the first few lines are often enough
So who can you build this for?
- Yourself!
If you have a regular routine of checking multiple news sites and platforms, you can build an automated daily digest email to make your routine more efficient.
- Your Company
If your company is in a certain industry creating a daily digest for your team is a great way to keep on track of things like legal, regulatory and industry news. Having that information ahead of your competition might be the way your company stays ahead, and if that happens, they’ll be sure to thank you!
- A Certain Industry
To zoom out from the company use case, you might decide that a certain industry really struggles to keep on top of all the news. For example, maybe you have a friend who is a tradesman, he’s a plumber and is constantly on the tools or running site to site. But, he wants to keep on top of certain trade publications, along with some media focused on his industry. A daily digest might be the perfect solution so he feels on top of the news.
- A Geographic Location
Some parts of a country don’t get the attention they deserve. As a result usually a few publications emerge to try address what is happening in that area. But, maybe none of them quite give the residents all the information they want, from local news, sports results and, even, government or political updates. So here’s a use case where you can build something that rolls up all the insights a local citizen needs to know to stay on top of everything important.
How much does it cost to build and maintain a daily digest email?
The good news is that there are definitely cheap options, especially if you just want to build something for yourself.
However, if you are looking for something that will scale or be a bit more custom for a wider number of users like an industry newsletter, it is slightly more expensive. However, with all no-code projects, tools that aren’t free will save you time and work, and are usually worth your dollars.
Big consideration: RSS Feeds
Besides the tools you use, one of the main considerations that I was unaware of when starting the project was determining how easily accessible the RSS Feeds are for the resources you’re looking to use.
What is an RSS?
RSS is short for Really Simple Syndication, and is defined as a web feed that allows users and applications to access updates to websites in a standardized, computer-readable format. Think about it as a broadcast that constantly updates every time a new piece of content on a website is published.
When building my email, I found that RSS Feeds and their availability typically fell into three buckets:
- Some sites have open, easily accessible RSS Feeds
- Some sites have very strict or restricted RSS Feeds
- Some sites do not have RSS Feeds and actively might try to restrict access
The more open and accessible, obviously the better.
To give some examples of each:
Hacker News has an awesome RSS Feed that has multiple feeds and options, allowing you to get feeds by everything from new posts, replies, comments, points, and even add filters like “only show articles with minimum X comments, and Y points”. I’m using this filtering feature to deliver only the most active and engaged content in The Tech Rooport.
Business Insider is now a fairly global enterprise, and when building The Tech Rooport I really wanted the Australian Business Insider, and more specifically, the Tech section. Unfortunately, to the best of my searching ability, I was only able to find the US Business Insider RSS News feed, which wasn’t relevant to what I was building.
- Many News Sites and Platforms!
Most news sites once had and embraced RSS feeds. But as the Media industry struggles financially, many want you to subscribe to their newsletters where they can serve promoted content, advertisements and occasionally spam you with an offer. Further, some have paywalled their content so don’t want RSS Feeds bypassing subscriptions. To ensure this, they’ve killed their RSS feeds or made it difficult for you to access their content.
But, not to fear! When you don’t have an easily accessible RSS Feed there are tools that help you create them and they’re easy to use!
But, because you’re using more tools as part of your stack, these can add to the cost.
So your email can cost you anywhere from US$8 per month to what The Tech Rooport is currently costing me, which is about US$30 per month, and more if you decide to add a lot more tailored RSS feeds or multiple campaigns.
What about maintenance?
The best thing about my set up and some of the options below is that these feeds are not curated daily i.e. I’m not spending an hour every day picking what goes in them, they are automated!
So the maintenance is really just checking the emails regularly and making sure nothing breaks, and if it does, fixing it before the next issue – most users will ignore and forget about a bug once – but won’t if it reoccurs. They’ll assume you’re not on top of it and you’ll lose them as subscribers.
If you build a daily digest for yourself, checking it daily which is why you built it, is your form of maintenance! So you just need to keep yourself happy!
What tools can you use to build a daily digest email?
There’s many ways to skin a cat and there’s certainly many routes you can take to build a daily digest email.
I’ve leaned on RSS Feeds, but you can certainly find a way to use a combination of scraping and automation tools. One approach I considered was using a scaping tool that added information to a google sheet and then using a no-code automation tool to recognise new records and add them to an email template, which then gets sent daily. Too many moving parts!
Ultimately I decided the approaches I show below seemed easier and less susceptible to failure due to minimising the reliance on too many inputs.
First, a disclosure: I do use affiliate links but I believe in Skin in the Game, so never recommend something I haven’t or don’t currently use and rate highly as a tool. Also, the links usually come with discounted rates or added credits for you, so use them!
1. An address to send them digital mails
An important component to sending out your mail digest is to have your email set up.
I’m not going to go into detail here as there are thousands of guides on how to set up a solid email address.
Fundamentally you have two options:
- Free: Use an existing personal email or create a new one using a free platform like Gmail or Hotmail i.e. yournewslettername@gmail.com
- Paid: Set up own your email via a custom domain name i.e. your@newslettername.com
2. The simple RSS powerhouse
If you’re looking to just build something quickly for yourself, here’s the simple, single tool you need.
Mailbrew is incredibly powerful and really simple, and best of all, you can create a free version to try it out for two weeks!
Simply, Mailbrew allows you to build newsletters or “brews”, from your favourite sources and feeds and configure them to send at certain times.
Even better is that is is fairly new tool built by two passionate creators, so they are constantly building out the platform and adding awesome features like the ability to get stock pricing, crypto pricing, or updates from social feeds (think Twitter or Reddit threads).
Here’s an example of what one of my test Brews looked like:
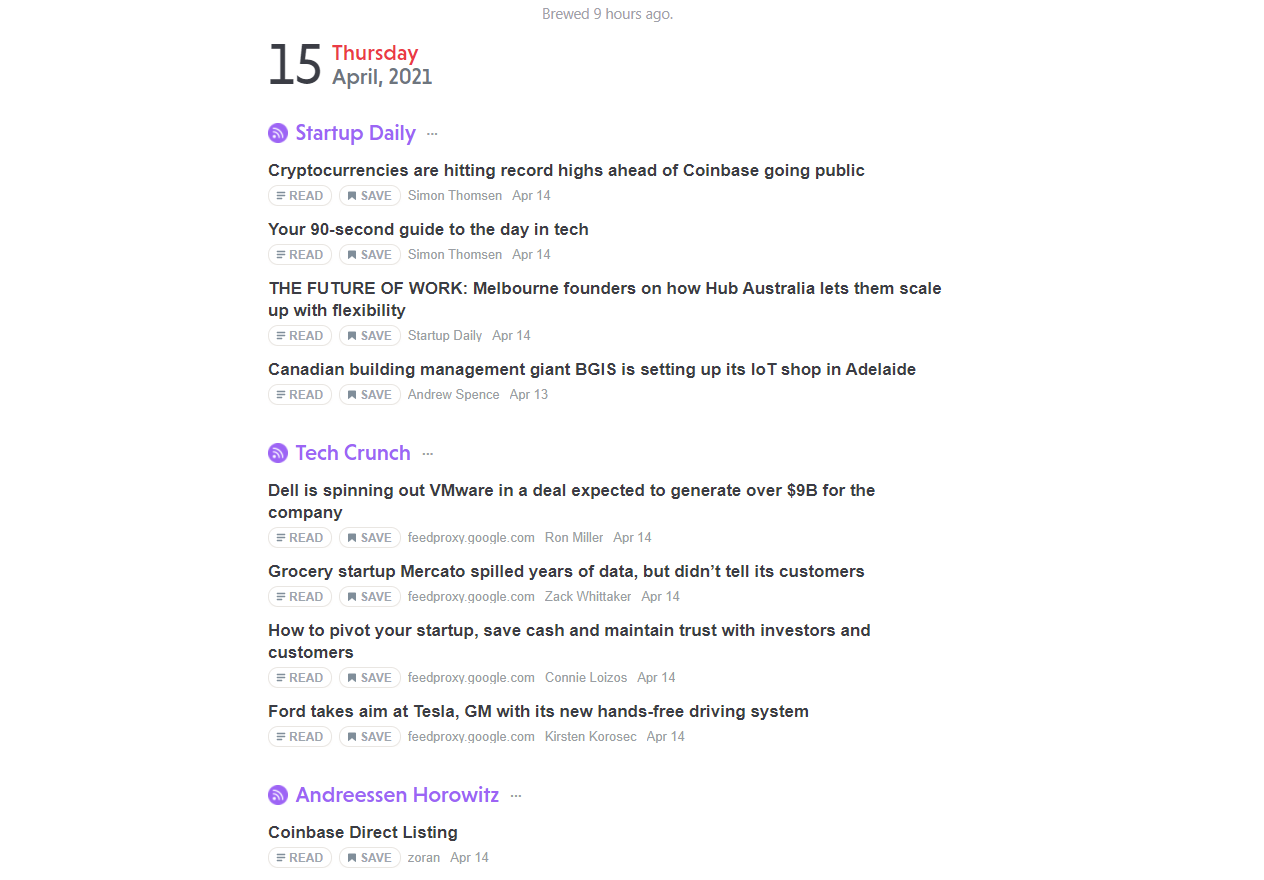
Honestly, few solutions are as simple as this and they’ve really solved the RSS Feed problem by allowing you to build your own custom feeds directly on their platform. It’s a single platform that handles a lot of the problems the other solutions require other tools to solve.
Free for 2 weeks, then US$8 a month, billed annually. So US$96 a year.
3. The RSS engine where you tune the performance
FlipRSS really is my secret sauce in powering The Tech Rooport.
It’s an RSS aggregator that is passionately built by a small team that allows you to build campaigns using multiple RSS feeds. I would say it is definitely built for campaigns and bigger newsletters than personal digests, so if you’re looking to build something for a larger audience, this is the tool.
However, it is a lot more hands on than MailBrew, but the output is solid, especially given you can build multiple campaigns and they’ve done some great work to ensure you can use their pre-made custom template and configure it with Mailchimp.
Further, it allows for some “tuning” per feed, so you can easily select how many articles you want from each feed, how you want them to appear (i.e. with images or text), and whether it should only show only new content or not.
There’s two things I really respect about the FlipRSS team:
- Given the company name is pronounced closely to “flippers” and their logo is a turtle: 5% of every FlipRSS subscription is donated to saving sea turtles. Awesome cause.
- They have a really great trial period, which is 30 days. It’s an awesome way to trial their platform with minimal stress, especially when testing can take a while if your email is only going out daily.
Here’s a look under the engine:
A couple of shortfalls with the product:
- Right now it only connects with Mailchimp, so if you’re used to another mail campaign provider this might be an issue.
- Customising templates isn’t incredibly easy at the moment and there’s only one template that is available for you to play with, but you can add a header image and change up some colours and design elements. You can also create your own and add custom code.
All plans have a 30-day free trial, and then pricing starts at £19.99 / month for 1 automated campaign with up to 10 RSS feeds.
4. The solution for generating and building feeds
As mentioned above, one of the main considerations is RSS feeds. If a site doesn’t have one it can be challenging to get the information you need to add to your email campaign.
For this reason, Mailbrew is really impressive. If you’re building your own daily digest, they’ve handled majority of this pain-point by helping you build really custom feeds, easily on the platform. It’s definitely the most powerful component of the tool because it seriously takes a lot of this pain away.
However, if you’re not building on Mailbrew and want to build something a bit more robust, like me, you need to create your own RSS feeds if they’re not readily available.
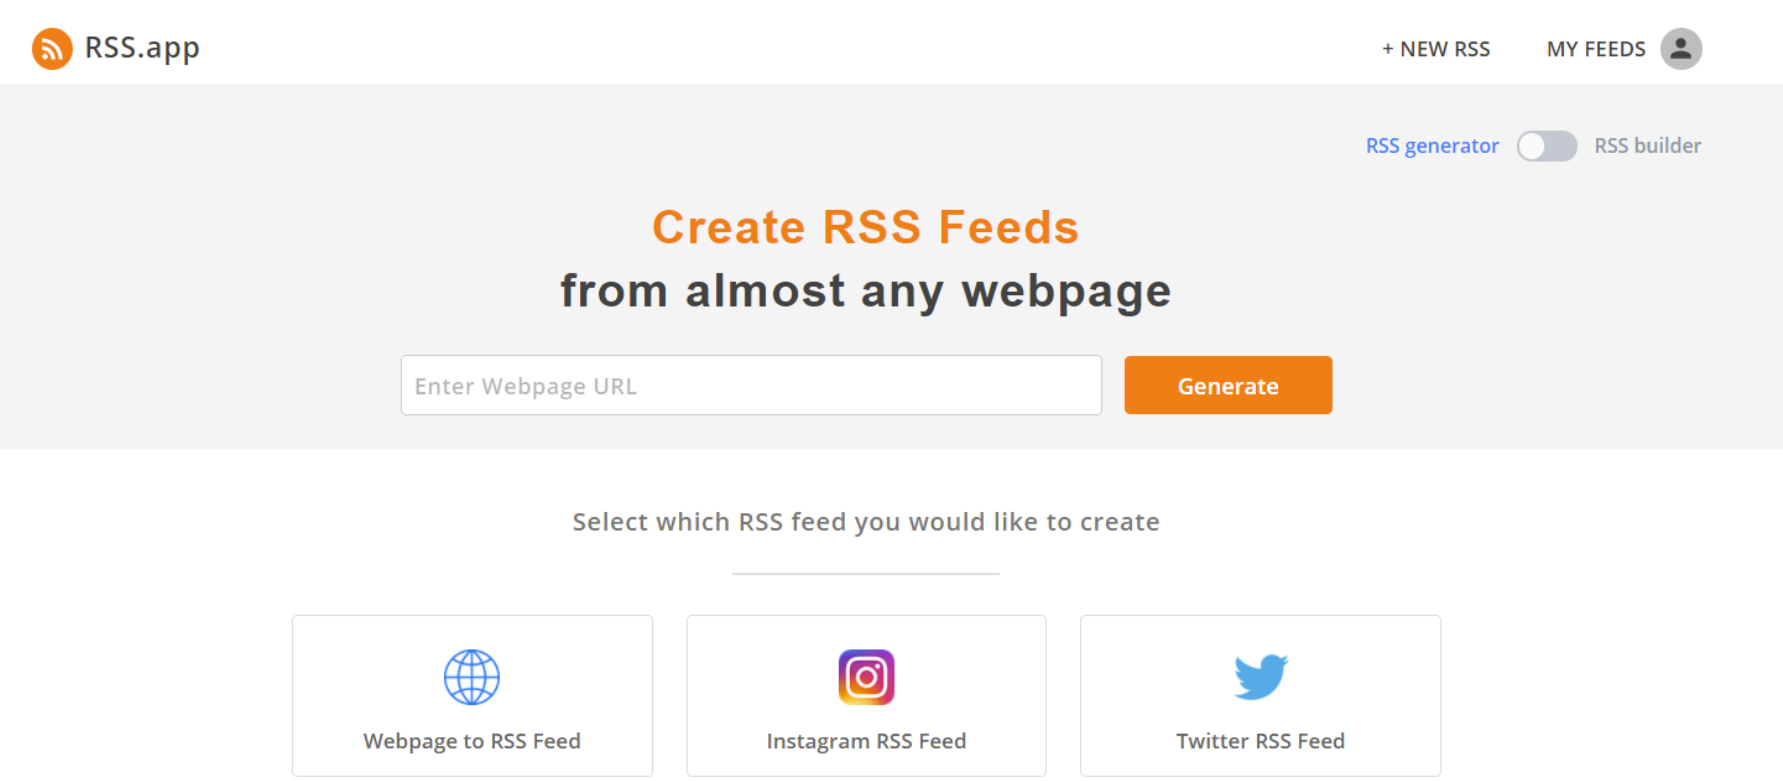
The good news is that this is not that hard, thanks to RSS.app.
RSS.app allows you to get RSS Feeds from almost any webpage by simply pasting in the site URL. They’ll then take care of the magic and provide you with a feed link. They also have great support. They really helped me tweak my feed and were quick to respond when I wasn’t sure it was delivering exactly what I wanted.
When you create your own account you’re instantly enrolled on a free 7-day trial of the premium plan which allows up to 10 feeds. The best part is there’s no credit card needed to start, and the 7 days gives you just enough time to do a few days of testing and monitoring. Personally, the 7 days felt a bit stressful, I’d love 10 – 14 days, but free is free so I can’t complain!
When you’re done with the plan you can stick with their free plan which comes with 2 feeds, 24 hour refresh rate and only 5 posts per feed. Personally, I’ve used the Premium plan which is reasonable at US$9.99 per month (charged monthly, luckily!) for 40 feeds, 30 minute refresh rates, 25 posts per feed and a whole lot more features.
5. The O.G. email campaign provider
Every day there seems to be a new email tool for creators, disrupting the older players, from ConvertKit to Substack.
Personally, I use ConvertKit for my own personal newsletter, but for this stack using FlipRSS, it was a requirement to use Mailchimp (as currently they only support Mailchimp integration).
Whilst Mailchimp has grown to be a full fledged powerhouse tool for sending email marketing campaigns, many have migrated away from it specifically as competitors have emerged to address specific niche needs – such as personal newsletters. However, it’s a tool that has been around for a long time and is arguably the most recognised email marketing tool, so you’re in good hands with the ‘Chimp.
One of the best features of Mailchimp is that it is a freemium tool. You can start totally free for up to 2,000 contacts and 10,000 sends per month.
This is great piece of mind to get scale and product-market-fit on your newsletter before jumping up a plan. The next plan starts at US$9.99 a month, so you don’t have to fear a massive jump in pricing when you do reach your free tier limits.
6. The simplest, most powerful website builder
If you’re going to be promoting your daily digest you’re going to need a website.
There’s plenty of website builders out there, some which are completely free, but few are as simple, powerful, and fully-responsive as another one of my secret weapons, Carrd.
Carrd is truly an unbelievable piece of weaponry to have in your tech arsenal of awesomeness.
They pride themselves on specialising in one-page sites, so they’re perfect for things like personal profiles or landing pages to capture emails – exactly our use case in this project.
They are a fairly simple drag and drop platform, so if you’ve ever built something with drag and drop you’ll find it incredibly easy. Think of it a bit like Canva for one-page websites.
Here’s a look under the hood of The Tech Rooport‘s landing page:
They have a variety of templates to use and the best part is their pricing..
Carrd is not free, but it’s so cheap it might as well be. It’s just absurdly cheap for how powerful it is.
Firstly, you can build a site without signing up or putting down a credit card, and then you get to try their Pro tier for 7 days, free.
Once you’ve built a really awesome landing page – and that you will! Trust me, you’ll be converted!
You then just have to chose a plan. Their most basic paid plan is their Pro Lite tier for 3 sites, no branding and premium Carrd URLs for US$9 a year. Yes. A year!
Next tier up, which I recommend is Pro Standard, here you’ll get the ability to build up to 10 sites and have Custom Domain URLs, so you can host these sites on your own domain, for only US$19 a year. $10 more than the Lite plan, and this is for a whole year. Seriously, I think its one of the greatest tools in my kit and for one of the most reasonable and approachable prices.
7. Your AI graphic designer, logo-generating friend
If you’re going to promote your daily digest email to a wide audience, you’re going to need to:
- Come up with a name
- Come up with a logo to create a brand
I’ll leave you to handle 1. yourself, but when it comes to 2. you don’t have to Looka over your shoulder, because Looka has your back (sorry, I couldn’t help myself).
Looka is a tool that allows you to build a logo in minutes and then bring your whole brand to life by creating branding kits. Picture this, you don’t only get an incredible logo, but you get to see that logo during the creation phase as a business card, letterhead, retail sign, on a t-shirt and more!
Whilst plenty of companies have attempted to nail logo generation, you typically get an outdated piece of clipart paired with papyrus font, and nobody likes papyrus. But then Looka came along, creating awesome logos backed by their AI generator. You’ll get modern and refreshing logos built on thousands of assets and it’s totally customisable.
Even if Looka doesn’t give you the logo you’re exactly looking for, its the perfect place to start to get inspiration and hone in on what you want and do not want.
Some other options including playing around with Canva to ideate on a logo and font, but I still think Looka makes the process easier. Further, you can also go direct to a freelancing site like Fiverr and have a designer create one for you on the cheap. Or, my personal preference, start with Looka and live with the logo for a while and if you decide you need a little bit of touching up, get a Fiverr designer to make some small tweaks.
Logos and brand-creation can be seriously expensive business.
As the business tale goes with Steve Jobs and branding master, Paul Rand, who designed Job’s Apple competitor, NeXT’s logo for the equivalent of $245,000 in 2021 money, Jobs’ recalls:
I asked him if he would come up with a few options, and he said, “No, I will solve your problem for you and you will pay me. And you don’t have to use the solution! If you want options, go talk to other people! But I will solve your problem for you the best way I know how, and you use it or not, that’s up to you, you are the client. But you pay me.”
The lesson from the tale was that when dealing with a master they’ll deliver you your request, with clarity, and without hesitation or doubt in their choices. Rand did deliver, and Jobs’ learnt a great deal from his approach to business.
You can read more about that story here, but back to the issue at hand. What’s the dollar damage?!
Looka is really affordable when you compare it against other choices like paying a branding agency or single graphic designer and getting minimal options, or going on a crowd funding logo site which can end up costing US$500+ and you still might not love what you get.
Looka starts at just US$20 for their Basic plan, featuring a single PNG logo file, and then goes up to US$65 for their Premium plan which has multiple high-resolution files and unlimited post-purchase changes. These are one time fees, but you can also choose to buy a branding kit package, which is a solid option and comes as a subscription.
The subscription gives you both the logo and a brand kit with flyers and posters for US$4.99 a month, billed at US$59.88 for the year, or the Premium version, which is US$7.99 a month, billed at US$95.88 a year.
I’ve done both single one time payments and subscription for different projects. It really depends on what kind of project or business you’re building, but ultimately for under USD$100 to get a logo and a range of branded assets that you can continue to tweak, it’s an incredible price, and it’s why I’m such a big fan of Looka.
How do you build a daily digest email using RSS feeds?
Above this section I give a break down of all the tools I’ve used, what they are, their features and how much they cost, so make sure to check out each tool above. I’ve detailed them in order of need when building a daily digest.
Before you start building your daily digest, the first thing you need to do is understand your audience.
Who are you making this daily digest email for?
If the answer is just you or a handful of people, the simplest possible solution is using Mailbrew.
Mailbrew easily walks you through the process of creating a “brew” or newsletter and you can share that brew with more people. The other critical painkiller Mailbrew offers is that it makes generating custom RSS Feeds a total breeze.
If you want to build something quickly, or knock something out just for you or a handful of people, Mailbrew is the solution for you. Sign up with your email and you’ll be up and running in no time.
If you’re creating this for a wider audience, like your company, a certain industry or geographic location, you’ll want to consider something more robust so let’s use FlipRSS.
I recommend signing up for MailChimp first, then FlipRSS. FlipRSS relies on MailChimp so you can set up a basic free account first.
When you’re in MailChimp, you’ll want to quickly verify your domain or the email in which you’ll be sending from. It’s also worth adding your email or a secondary email to your Audience so you can do some testing and select that Audience.
As I mentioned above, FlipRSS really is the secret engine powering The Tech Rooport. It’s an RSS aggregation tool that allows you to build campaigns.
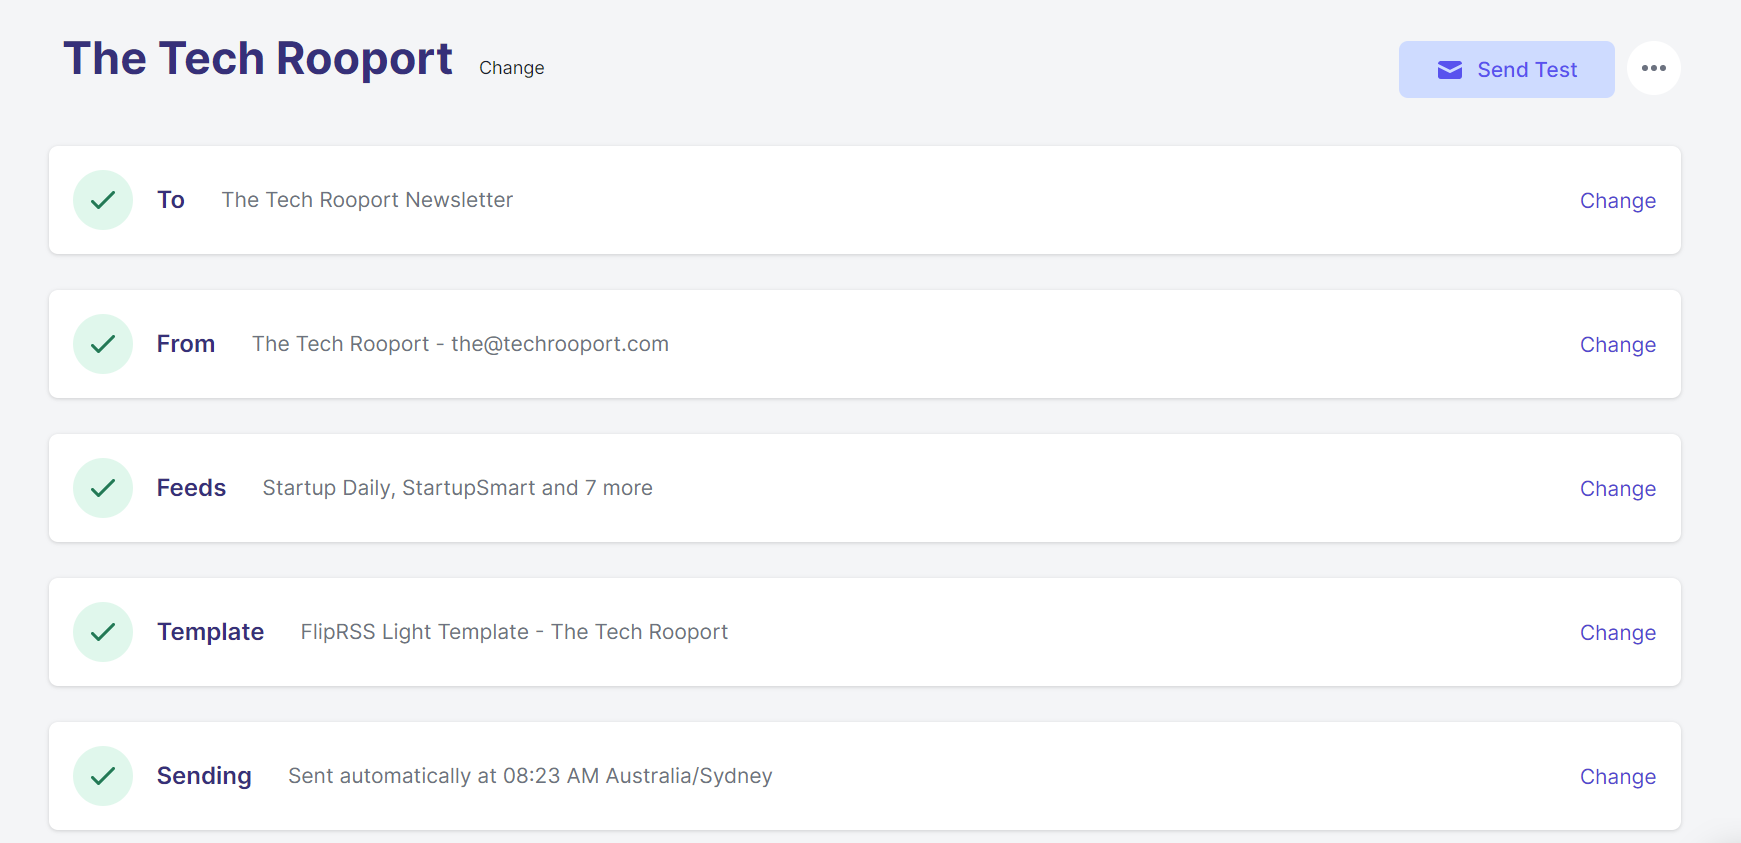
So sign up, create a campaign, select your Mailchimp audience list in the To section and then add all the information in the From section, like the name, subject and preview text:

Then we can then start working on content, so you’re going to need to ask yourself:
What information do you want delivered in your digest?
Or more importantly, what does your target audience want?
Here you’ll want to take the time and detail what sources of information you want and where that information comes from.
For The Tech Rooport, I knew I wanted some local media in Australia, as well as a touch of global news.
I detailed all my media sources and then determined whether they had an RSS feed.
To do this, it’s a simple matter of Googling: “<MediaName> RSS Feed”

Then checking through the feeds and ensuring they are updated (articles are from today) and they are what you want (you can see them in today’s version or the particular section of interest of the site).
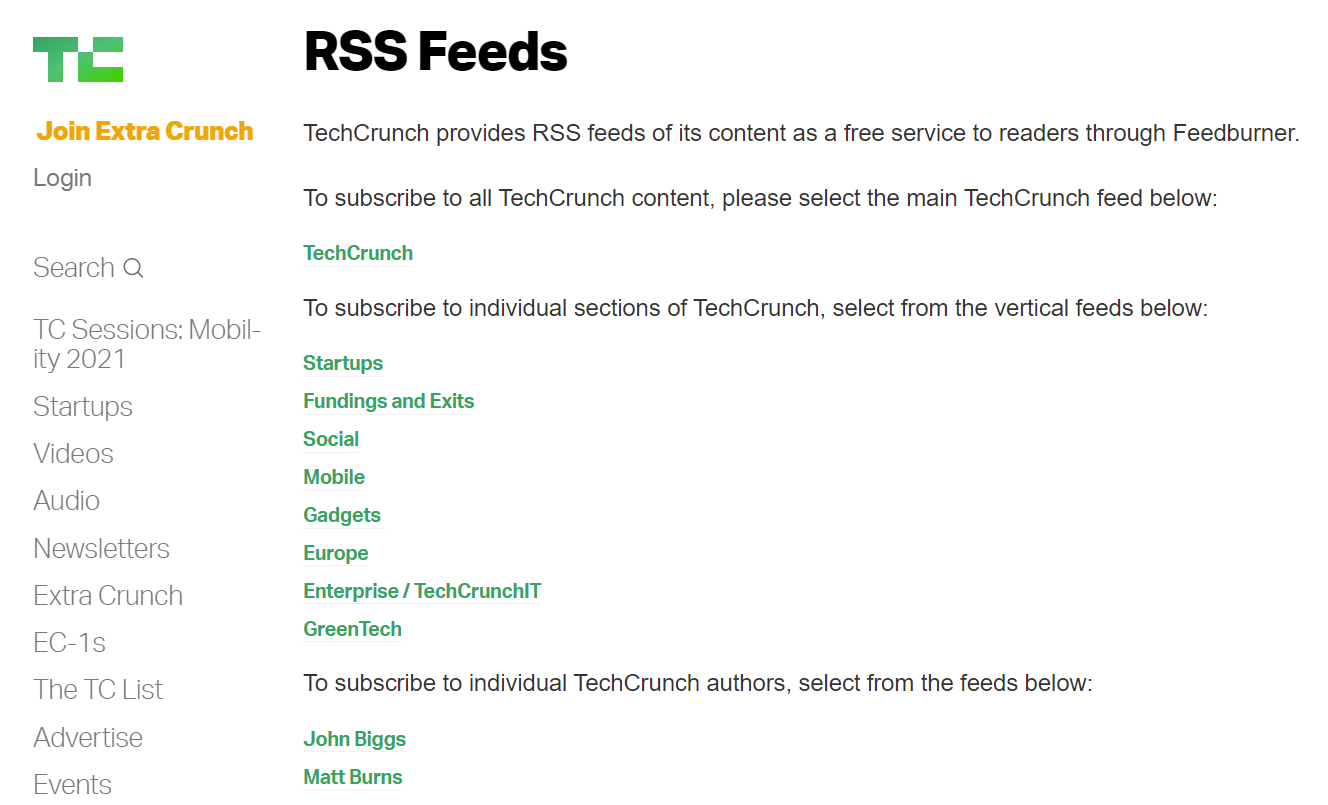
For example, TechCrunch has a well categorised RSS Feed page and given they have a dedicated page for it on their site (https://techcrunch.com/pages/rssfeeds/feed/), you can be assured they’re maintaining it:
When clicking one of these links, you can then check that the feed is active and delivering recent content. Given today is 14 April 2021, this feed looks good:

Work through each of your sources and identify if they have have a feed or not. If they have a feed you can add them straight into the Feeds section on FlipRSS.
If you can’t find an RSS feed after scouring the interwebs, you’ll then need to create one using RSS.app.
RSS.app helps you to create RSS Feeds when one isn’t readily available. It’s as simple as pasting in the URL and clicking generate:
RSS.App will then show you your RSS Feed on their platform. Check over it and compare it to the site and ensure its generating correctly.
Then, add it to your FlipRSS Feeds section.
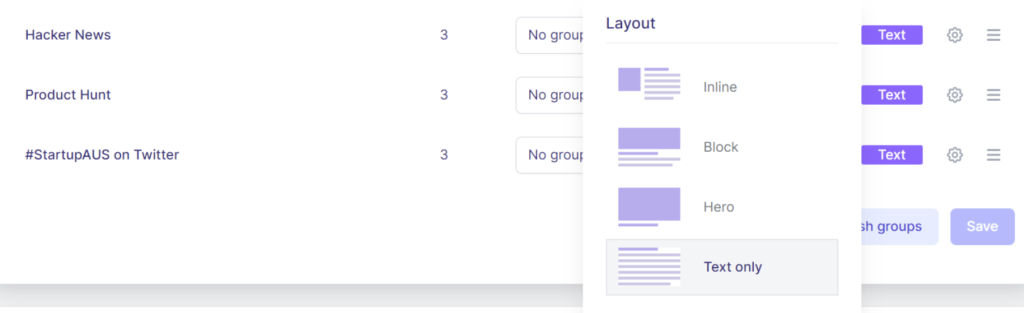
Once you’ve added all your feeds, you can configure FlipRSS on how you want your feeds to appear, by identifying:
- How many items from the feed you want to appear in your email
- The layout of the items, especially in relation to where the article image sits
- Whether you want only new items to show
You can now make some tweaks to how it displays in Mailchimp:
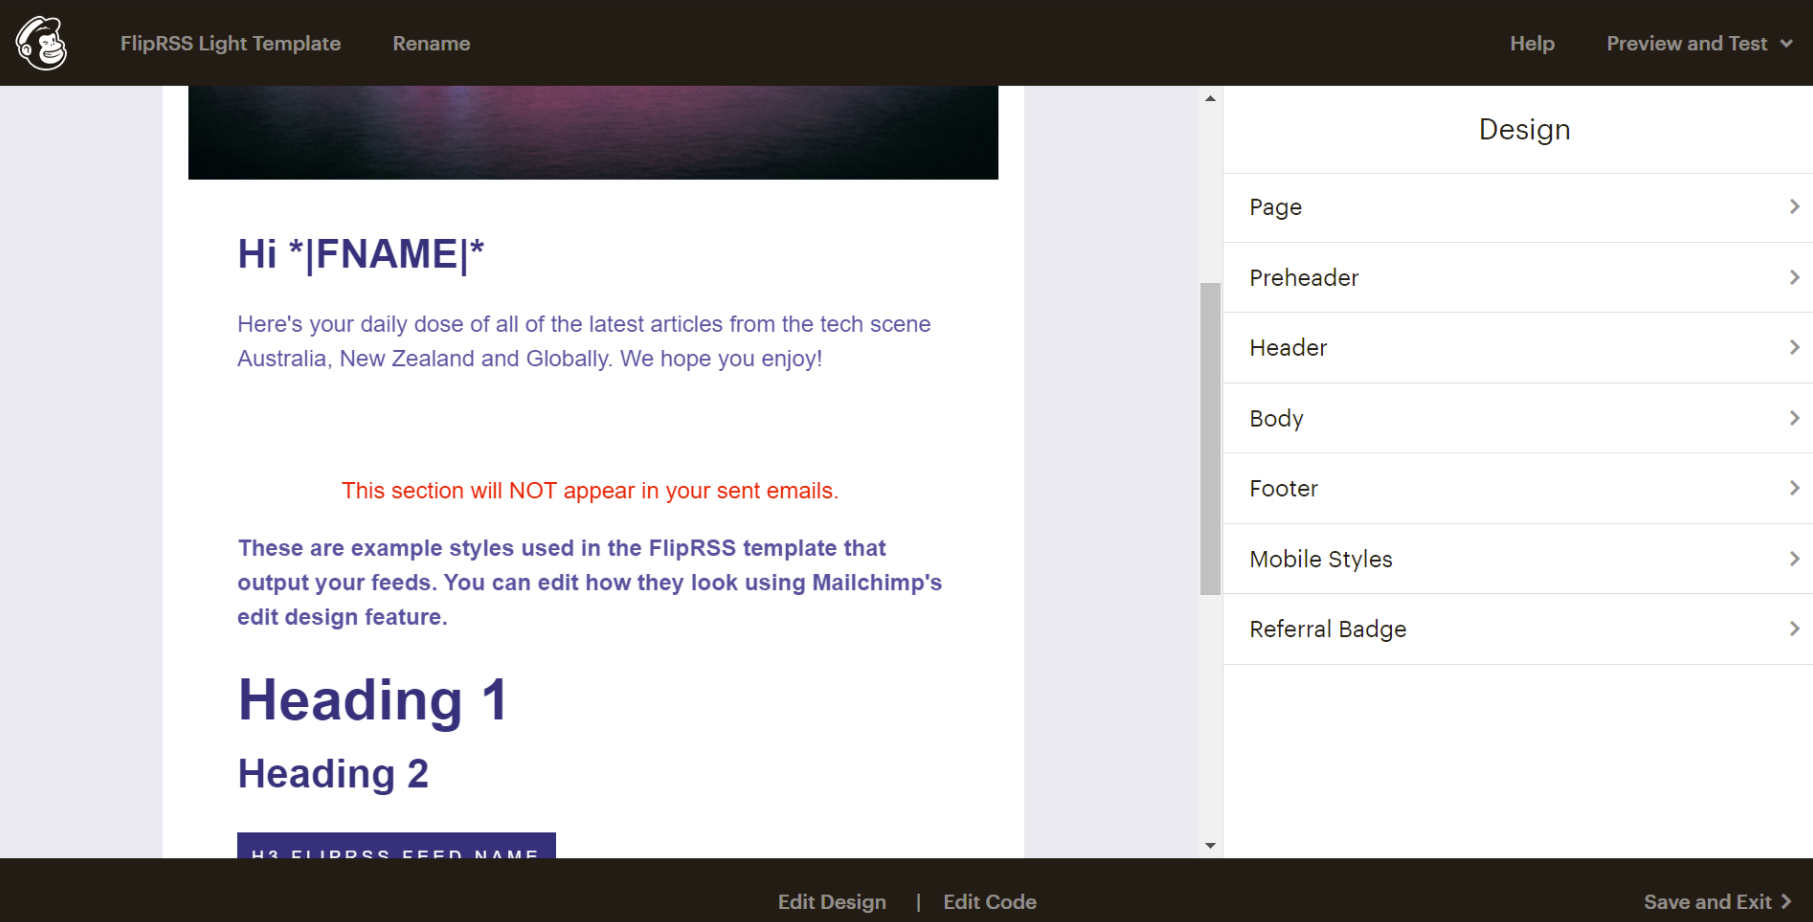
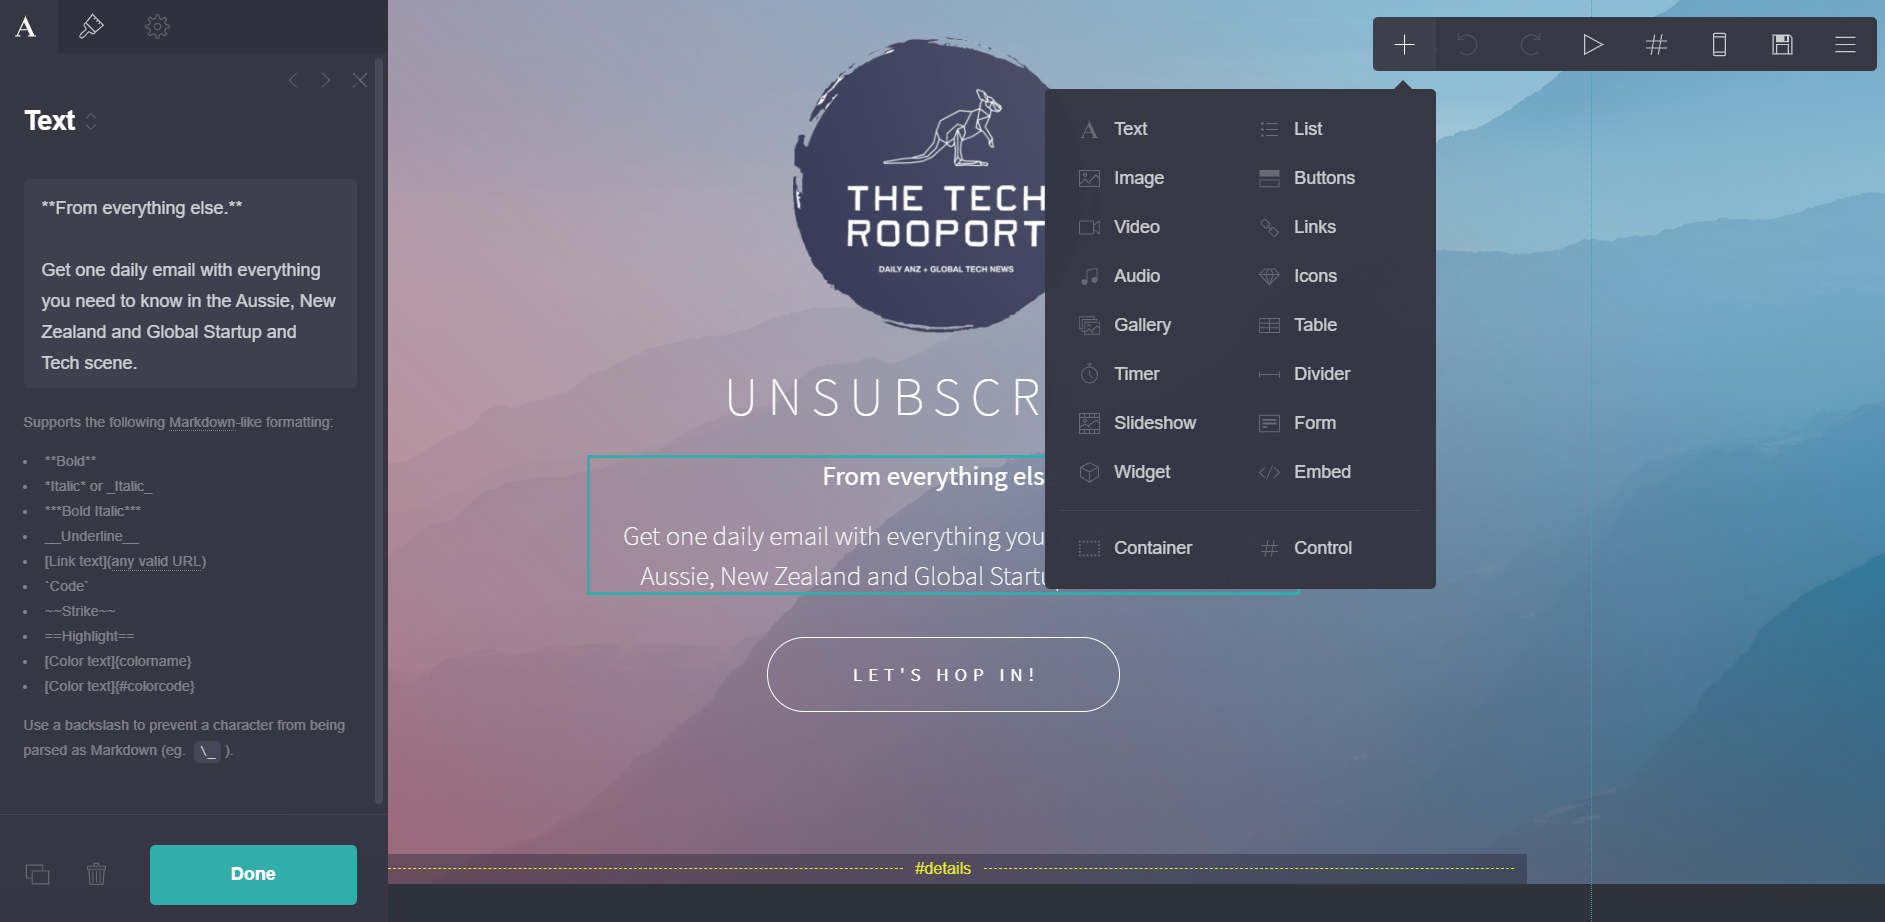
Click on each section and update items like the cover image, the welcome text, the font type and colour, and what appears in the footer. Then “Save and Exit”.
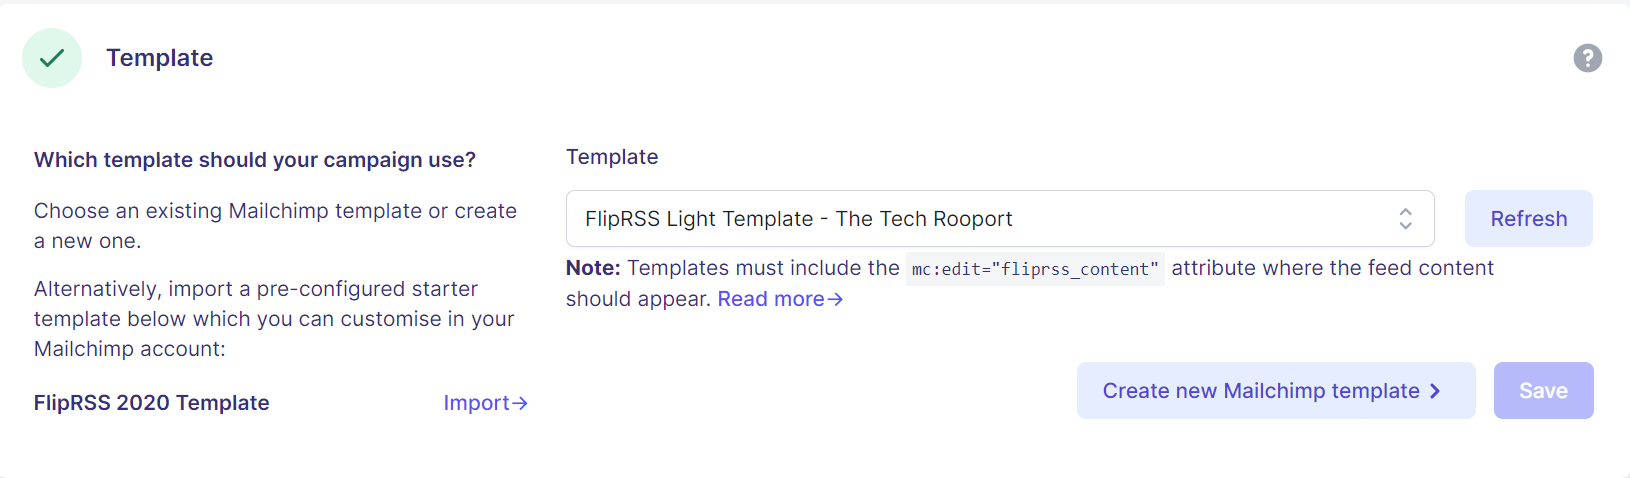
Then jump back into FlipRSS‘ Template section and you should be able to hit “Refresh” and see the template appear in your dropdown. Select it and hit “Save”:
Finally, the last step is deciding when you’ll be sending it.
You can send it daily, weekly, monthly or yearly, as well as specify an exact time and timezone:
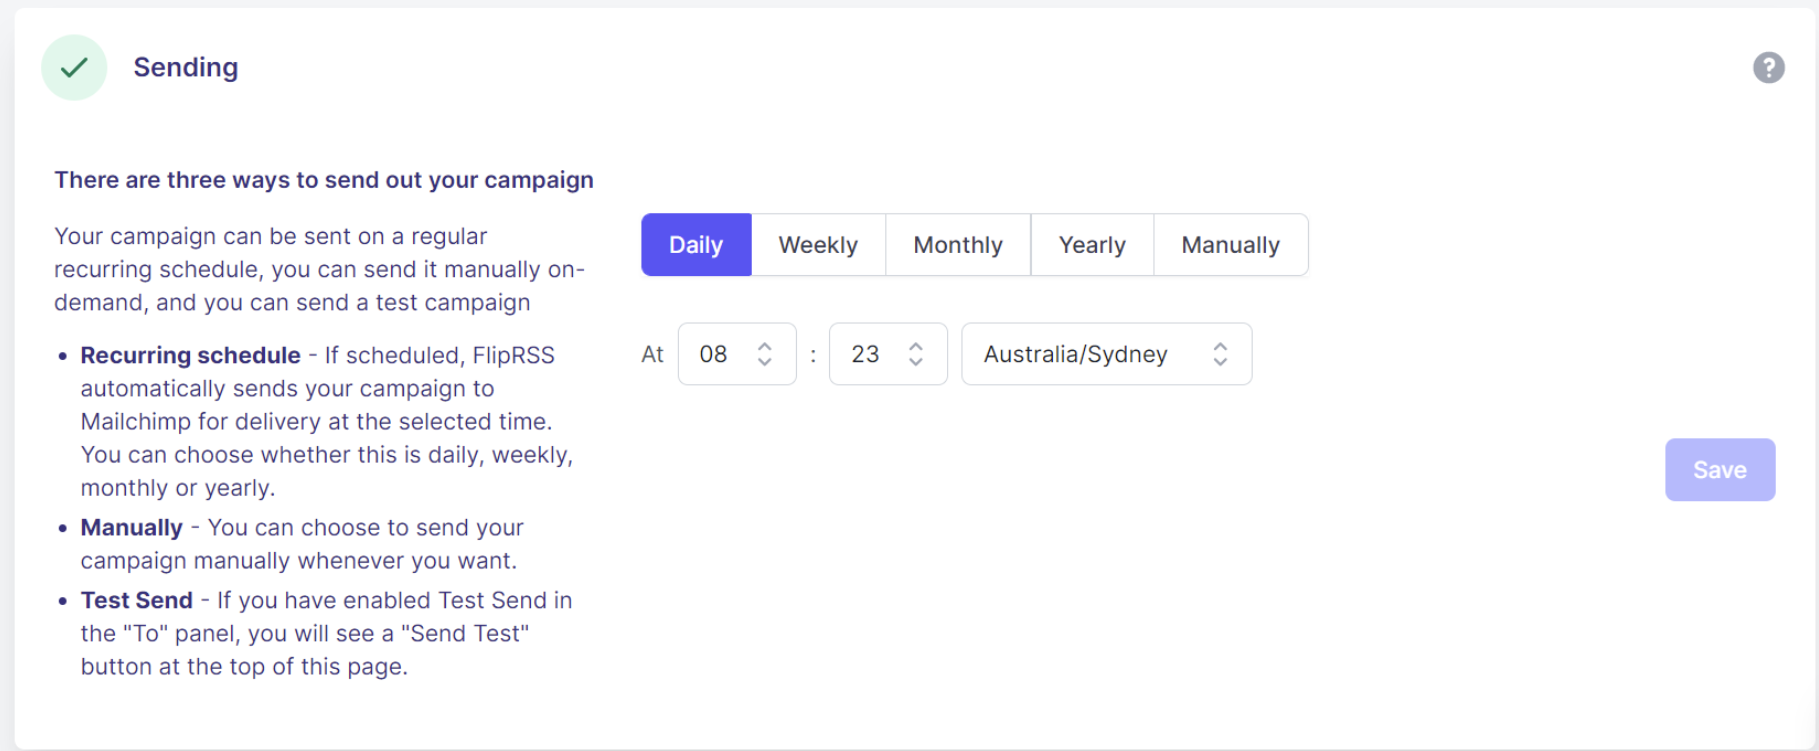
Hit “Save” and then scroll back up to the top to the To section, because you’re ready for a send test! Make sure you’ve selected “Use Test Send”. Then fire away by hitting “Send Test” and check your inbox to see what magic you have created!
How do you test and maintain a daily digest email?
If you’ve followed the steps above and created your daily digest email, whether using MailBrew or FlipRSS, it’s now time to test it.
The best way to test it is to do test sends and then go to your inbox and check the outcome. Systematically work through your email and take notes of what is working, what is not, and what you’d like to change. Then go back to your configuration and make the updates and send again, until you’re happy.
The best thing about maintenance is that there is very little.
Daily digest emails are set up to be automated. So they take no work from you to curate, and because they send daily, you can check they’re sending and overview the links regularly.
How to knock up a really quick, and awesome brand and sign up page?
If you’ve worked your way through how to build a daily digest email and you want to promote it, it’s time to build a super quick, slick sign up page so you can show it off and get subscribers.
To understand both the tools I recommend, make sure you’ve checked my breakdown of the features and pricing of both Looka and Carrd above.
If you want to name and brand your newsletter, follow below, otherwise if you just want a generic name and a landing page you can jump straight to the landing page section.
Knocking up an awesome brand
If you’re looking for a fresh, professional and quick brand, there’s only one place I recommend and that is Looka.
Head to Looka and add your business or newsletter name and click “Get Started”.
Looka will then take you through a series of quick steps before it’s AI starts suggesting and pumping out some awesome logos.
You can then favourite the ones you want and jump in and edit them. You can change every aspect of your logo from the icon, font, name, slogan, container, background and colour palette. It’s truly an awesome tool.
When you’re happy with your creation, you can share it with some friends and family to get feedback. When you’re ready to go, choose one of the options to purchase it.
As I detailed above, you can get a basic one time PNG file for US$20, or get a much more comprehensive branding package that includes a whole series of elements like social media templates, email signatures, posters, business cards for between US$4.99 per month and US$7.99 per month, billed annually. For under US$100 for a logo and brand elements, it really is a steal.
You’ve now created an awesome, quick and really affordable brand to get started! Go you!
Quickly launching a sleek landing page for newsletter sign ups
We’re now going to build an incredible, responsive and really cheap landing page, and there’s no better tool to do this than Carrd.
Head to Carrd and click “Choose a Starting Point” – no need to sign up just yet.
Carrd specialises in single page websites so browse the templates and choose a design that suits your brand and what you hope to detail on the page.
If you don’t have much to say, choose a simple form. If you want to outline some value propositions choose a longer landing page.
Because you’ll be using a form which is a Pro element, feel free to choose a Pro template and move forward with a free trial. Carrd is one of the cheapest tools in a modern tech makers arsenal, so its well worth the dollars if you decide to use it after the trial.
Carrd will then walk you through all the elements, so get stuck in and start updating the template:
When you’ve updated the template with some copy, your logo (if you made one), and are happy with the design, its time to add the sign up form so people can subscribe to your newsletter.
To do this, add a Form, then change the Type to Sign Up and select Via MailChimp:
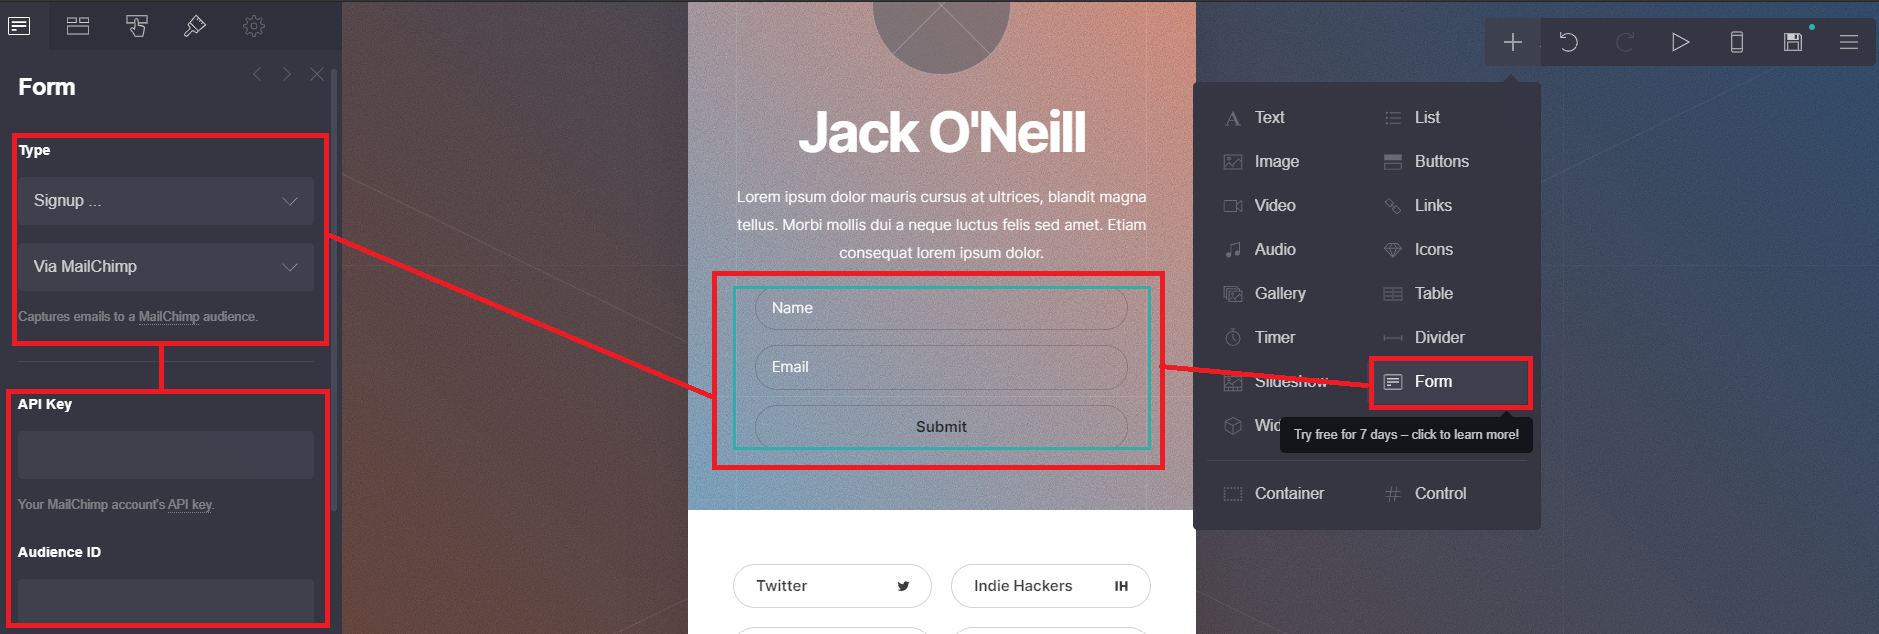
You then have to go to your MailChimp account and find your API Key and the Audience ID relating to your newsletter. The links on Carrd will help redirect you to these sections.
When you’re happy with your design, publish the site by clicking the floppy disk icon. Here you’ll also add all your information to sign up. You can publish the site with a Carrd URL to start, and if you decide to go on a Pro plan, with your own custom URL.
You should now have a slick looking website, possibly with a great new logo if you used Looka, and now its your time to promote it and start getting those sign ups!
Recap: How to build an RSS feed daily digest email
For a quick simple solution for yourself, use Mailbrew.
For something more robust use FlipRSS, using these steps:
- Sign up for Mailchimp – verify your domain
- Sign up for FlipRSS – create a campaign, add information in the To and From sections
- Start adding existing RSS Feeds to the Feed section, or create your own using RSS.app
- Depending what you want to show, configure your feeds
- Create or import a template into MailChimp and design to your preference
- Select the template in FlipRSS and configure your Sending schedule
- Test, review, update and test again – rinse and repeat
- Create a beautiful logo with Looka
- Build a sleek website for sign ups with Carrd
- Share it with the world!
Good luck with your daily digest newsletter!
I’d love to know if you used this whole guide and how it all went for you! You can contact me here.
Also, don’t forget to tell the world about your achievement! Click to Tweet here:
I just built a daily digest email using no-code! It's totally automated and awesome! And you can build one too! Thanks to @kevjochelson, @mailbrew, @flipRSS, @RssDotApp, @Mailchimp, @lookadesign. Here's the guide I used:
If you got value out of this please share it with anyone you think will find it beneficial. I also #buildinpublic. I share regularly via Twitter, and send out more exclusive content on my own personal newsletter.
You can follow me and sign up below:
Blog cover art designed with Icons8